| 일 | 월 | 화 | 수 | 목 | 금 | 토 |
|---|---|---|---|---|---|---|
| 1 | 2 | 3 | 4 | 5 | 6 | 7 |
| 8 | 9 | 10 | 11 | 12 | 13 | 14 |
| 15 | 16 | 17 | 18 | 19 | 20 | 21 |
| 22 | 23 | 24 | 25 | 26 | 27 | 28 |
- MVVM pattern
- 자바
- LinkedList
- 웹크롤링
- PYTHON
- 안드로이드 테스트
- ubuntu python
- 안드로이드 디자인패턴
- Data structure
- Android test
- Kotlin
- dagger-hilt
- Android
- flutter
- graphQL
- mvvm
- Design Pattern
- 유니티
- 안드로이드
- Apollo GraphQL
- unit test
- Dependency Injection
- 우분투 파이썬
- prisma
- 안드로이드 mvp
- Nexus GraphQL
- 파이썬 크롤링
- 자바기초
- java
- Apollo Server
- Today
- Total
Hun's Blog
Android GraphQL tutorials (1) - Apollo Client? / setup apollo schema 본문
Android GraphQL tutorials (1) - Apollo Client? / setup apollo schema
jhk-im 2020. 12. 11. 17:16Nexus GraphQL tutorials 를 통해서 Nexus - Prisma - PostgreSQL로 이루어진 서버가 간단하게 구현되었다.
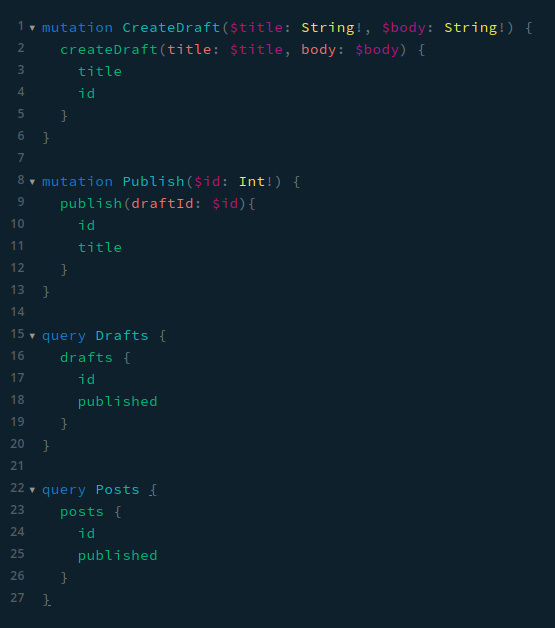
현재 서버에 구현되어있는 쿼리와 뮤테이션은 다음과 같다.

해당 화면은 Graphql playground이며 구현된 쿼리와 뮤테이션을 다음과 같이 사용해볼 수있다.
Draft 쿼리에 대하여 결과를 확인해 볼 수 있다.

이제 Android Kotlin 환경에서 해당 쿼리와 뮤테이션을 사용해보도록 하겠다.
Get started with Kotlin
A guide to using Apollo with Android
www.apollographql.com
apollo graphql은 안드로이드 환경에서 apollo client를 사용할 수 있도록 문서를 제공하고 있다.
해당 가이드를 참고하여 서버에서 구현한 createDraft, publish, drafts, posts를 테스트해보도록 하겠다.
Add the Gradle Plugin
// build.gradle(project)
...

ext {
...
    // apollo graphql
    apolloVersion = '2.4.6'

    // coroutines
    coroutinesVersion = '1.4.0'
...
}
// build.gradle(app)
plugins {
id 'com.android.application'
id 'kotlin-android'
id 'kotlin-kapt'
id 'kotlin-android-extensions'
id 'com.apollographql.apollo' version "$apolloVersion"
}
...
apollo {
// instruct the compiler to generate Kotlin models
generateKotlinModels.set(true)
}
dependencies {
...
// apollo graphql
implementation "com.apollographql.apollo:apollo-runtime:$apolloVersion"
implementation "com.apollographql.apollo:apollo-coroutines-support:$apolloVersion"
// coroutines
implementation "org.jetbrains.kotlinx:kotlinx-coroutines-core:$coroutinesVersion"
implementation "org.jetbrains.kotlinx:kotlinx-coroutines-android:$coroutinesVersion"
...
}
Download schema.json file
서버로부터 schema 정보를 받아 json 파일에 저장해야한다.
우선 graphql에 관련된 파일들이 위치할 디렉토리를 생성하고 schema.json 파일과 LauchDetails.graphql 파일을 생성한다.

로컬 서버가 돌아가고있는 상태에서 안드로이드 스튜디오 터미널에 다음과 같은 명령어를 입력한다.
./gradlew downloadApolloSchema
--endpoint="http://localhost:4000/graphql/endpoint"
--schema="app/src/main/graphql/jrooms/example/schema.json"
--endpoint에 로컬서버의 endpoint 경로를 입력한다.
--shcema에 위에서 생성한 schema.json 파일의 경로를 입력한다.

해당 명령어를 실행하면 schema.json 파일에 다음과같이 서버의 schema 정보가 자동으로 입력된다.

LaunchDetails.graphql 파일에는 playground에 입력한 쿼리와 뮤테이션을 다음과 같이 입력해주면 된다.
// LaunchDetails.graphql

mutation CreateDraft($title: String!, $body: String!) {
    createDraft(title:$title, body: $body) {
        title
        id
    }
}

mutation Publish($id: Int!) {
    publish(draftId: $id){
        id
        title
    }
}

query Drafts {
    drafts {
        id
        published
    }
}

query Posts {
    posts {
        id
        published
    }
}
이제 안드로이드 스튜디오의 Build -> Clean Poject와 Rebuild Project를 차례대로 실행한다.
Build to Apollo Client
마지막으로 Activity onCreate() 내부에 다음과 같은 코드를 추가한다.
override fun onCreate(savedInstanceState: Bundle?) {
        super.onCreate(savedInstanceState)
        setContentView(R.layout.activity_main)

        // First, create an `ApolloClient`
        // Replace the serverUrl with your GraphQL endpoint
        val apolloClient = ApolloClient.builder()
            .serverUrl("http://10.0.2.2:4000/graphql/endpoint")
            .build()


            ...

 }
apolloClient 를 build하는 코드를 보면 serverUrl을 입력한다.
테스트는 안드로이드 애뮬레이터를 통해 진행된다.
로컬 서버를 연결하기위해 endpoint에 http://localhost:4000 을 입력하면 될것같지만 안드로이드 애뮬레이터에서는 localhost로 입력했을 때에는 경로를 찾지 못한다. localhost 대신 10.0.2.2를 입력하면 된다는 글을 많이 보았으나 동작하지 않았다.
그래서 다음과 같이 셋팅해 주어야 했다.
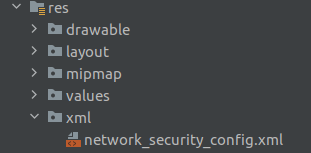
res/xml/network_security_config.xml 을 생성한다.

아래와 같은 내용을 추가해준다.
 <?xml version="1.0" encoding="utf-8"?>
<!--
reference
https://qastack.kr/programming/6760585/accessing-localhostport-from-android-emulator
-->
<network-security-config>
    <domain-config cleartextTrafficPermitted="true">
        <domain includeSubdomains="true">localhost</domain>
        <domain includeSubdomains="true">10.0.2.2</domain>
    </domain-config>
</network-security-config>
AndroidManifest.xml
    <uses-permission android:name="android.permission.INTERNET" />

    <application
        ...
        android:networkSecurityConfig="@xml/network_security_config"
        tools:targetApi="n">
    </application
    ...
Test ApolloClient with Coroutines
다음으로 onCreate() 내부에 코루틴 + Apollo client를 활용하여 로컬 서버의 쿼리와 뮤테이션을 테스트하는 코드를 추가한다.
override fun onCreate(savedInstanceState: Bundle?) {
        super.onCreate(savedInstanceState)
        setContentView(R.layout.activity_main)

        ...

        GlobalScope.launch {
            val response = try {
                apolloClient.mutate(CreateDraftMutation("android", "client")).toFlow().collect {
                    Log.e("response", "${it.data?.createDraft}")
                }
                apolloClient.mutate(PublishMutation(3)).toFlow().collect {
                    Log.e("response","${it.data?.publish}")
                }
                apolloClient.query(PostsQuery()).toFlow().collect {
                    Log.e("response", "${it.data?.posts}")
                }
                apolloClient.query(DraftsQuery()).toFlow().collect {
                    Log.e("response", "${it.data?.drafts}")
                }
            } catch (e: ApolloException) {
                // handle protocol errors
                Log.e("exception", "${e.message}")
                return@launch
            }
 }
위에서부터 CreateDraftMutation, PublishMutation, PostsQuery, DraftQuery 를 차례대로 실행한다.
네트워크 요청이기 때문에 코루틴 스코프 내부에서 사용되며 try{}catch{}를 통해 exception을 체크한다.
toFlow().collect {} 를 통해서 로컬서버의 뮤테이션과 쿼리를 성공적으로 사용한 후 결과값을 log를 통해 출력한다.
log로 출력되는 내용은 playground에서 출력되는 내용과 동일하다.
앱을 실행하고 다음과 같이 로그가 찍히면 성공!

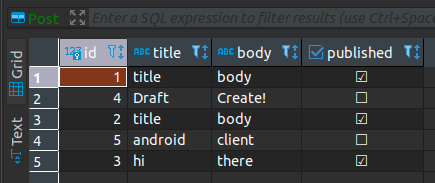
dbeaver + postgreSQL을 통해 Post 테이블이 뮤테이션과 쿼리의 결과를 잘 반영하였는지 확인해보았다.

https://github.com/jhk-im/gql-talk
GitHub - jhk-im/gql-talk: Android Kotlin Client & TypeScript Nexus GraphQL Server
Android Kotlin Client & TypeScript Nexus GraphQL Server - GitHub - jhk-im/gql-talk: Android Kotlin Client & TypeScript Nexus GraphQL Server
github.com
'Backend > GraphQL' 카테고리의 다른 글
| Nexus GraphQL tutorials (5) - Persisting data (via Prisma) (0) | 2020.12.07 |
|---|---|
| Nexus GraphQL tutorials (4) - Testing your API (0) | 2020.12.07 |
| Nexus GraphQL tutorials (3) - Adding mutations to Your API (0) | 2020.12.01 |
| Nexus GraphQL tutorials (2) - Schema란? / Writing your first schema (0) | 2020.11.30 |
| Nexus GraphQL tutorials (1) - GraphQL이란? / setup and first query (0) | 2020.11.29 |


